The Banshee Quest: Difference between revisions
No edit summary |
No edit summary |
||
| (8 intermediate revisions by 2 users not shown) | |||
| Line 5: | Line 5: | ||
<b>Monsters:</b> [[Scorpion]], [[Skeleton]], [[Ghoul]], [[Stalker]], [[Ghost]], [[Mummy]], [[Demon Skeleton]], [[Banshee]], [[Giant Spider]], [[Dragon Lord]], [[Warlock]].</br> | <b>Monsters:</b> [[Scorpion]], [[Skeleton]], [[Ghoul]], [[Stalker]], [[Ghost]], [[Mummy]], [[Demon Skeleton]], [[Banshee]], [[Giant Spider]], [[Dragon Lord]], [[Warlock]].</br> | ||
==<span style="font-size:150%;">Spoiler:</span>== | |||
<span style="font-size:140%;"><b>Requirements:</b></span></br> | |||
Started [[Blessed Ankh Quest]] to be able to descend into the monastery catacombs on [[Isle of Kings]]. | |||
Completed [[Family Brooch Quest]] to get to [[Isle of Kings]]. | |||
[[File:Rope.gif]] [[Rope]] or Magic Rope spell</br> | [[File:Rope.gif]] [[Rope]] or Magic Rope spell</br> | ||
[[File:Black Pearl.gif]] [[Black Pearl]] (one per person)</br> | [[File:Black Pearl.gif]] [[Black Pearl]] (one per person)</br> | ||
| Line 12: | Line 15: | ||
[[File:Pick.gif]] [[Pick]]</br> | [[File:Pick.gif]] [[Pick]]</br> | ||
[[File:VialBlood.gif]] [[Vial of Blood]] (one per person)</br> | [[File:VialBlood.gif]] [[Vial of Blood]] (one per person)</br> | ||
---- | |||
<span style="font-size:140%;"><b>Description:</b></span></br> | |||
*At the beginning, we go to [[Ghostland]] (image 1). We go down, cross the square and go down once more. Then we follow the arrow (image #2). | |||
*To get to the hole behind the magic walls, we need to move two levers, which are located southwest and east of our hole (green arrows). The levers are protected by [[Giant Spider]] (to the right) (<span style="color: red;">NOTE!!!</span> once you enter the room with them the bars will close behind you), [[Demon Skeleton]]s, [[Ghoul]]s and some [[Scorpion]]s (to the left). When you switch them we return to magic walls again (NOTE!!! if there are more than five going, remember that on the sixth field behind magic walls there is a place causing them to reappear - Image 4). Enter the hole then go to the room. Next to the throne there is a lever marked in red(Image 5). | |||
*Under the throne lies a body and in it a book, needed for the [[Blessed Ankh Quest]]. | |||
<span style="font-size: | *Move it, and go down to the room with the teleport, enter it, and find yourself on the other side. We go to 1/3 of the length of the corridor and use the [[Pick]] (image #6 first red arrow), enter the resulting hole go down. There you will see a blue flame, enter it causing 2 Ghosts and a [[Demon Skeleton]] to appear. The fire teleports to a room with another fire, you should enter it (return). We go to the south of the corridor and use the rope to go further south to the stairs (on the 2nd side 4 [[Demon Skeleton]]s, 3 [[Stalker]]s and 3 [[Ghost]]s are waiting for us. We go down the stairs. We appear in an intricate corridor (picture #7). After a while we find ourselves in a room with levers. We move them as in image #8, and enter the "fire". | ||
At the beginning, we go to [[Ghostland]] (image 1). We go down, cross the square and go down once more. Then we follow the arrow (image #2). | |||
To get to the hole behind the | |||
Under the throne lies a body and in it a book, needed for the [[Blessed Ankh Quest]]. | |||
Move it, and go down to the room with the teleport, enter it, and find yourself on the other side. We go to 1/3 of the length of the corridor and use the [[Pick]] (image #6 first red arrow), enter the resulting hole go down. There you will see a blue flame, enter it causing 2 Ghosts and a [[Demon Skeleton]] to appear. The fire teleports to a room with another fire, you should enter it (return). We go to the south of the corridor and use the rope to go further south to the stairs (on the 2nd side 4 [[Demon Skeleton]]s, 3 [[Stalker]]s and 3 [[Ghost]]s are waiting for us. We go down the stairs. We appear in an intricate corridor (picture #7). After a while we find ourselves in a room with levers. We move them as in image #8, and enter the "fire". | |||
[[File:Banshe Quest.PNG]] | [[File:Banshe Quest.PNG]] | ||
We continue to follow the arrow (image #11). We go, up and have to go through the stones in a special order: (We only stand on X - picture #12!) Then we follow the arrow (picture #13). We find ourselves in a great hall, there are many [[Ghost]]s and [[Demon Skeleton]]s here. We head north. | *Head to the stairs (image #9), on the way you will encounter [[Mummy]]s, [[Ghoul]]s and the like. Once you are on the floor below, head here (image #10).</br> | ||
<span style="color:red;>WARNING!!!</span> On the way you will meet, about 10 [[Banshee]] and some [[Stalker]]s! | |||
*We continue to follow the arrow (image #11). We go, up and have to go through the stones in a special order: (We only stand on X - picture #12!) Then we follow the arrow (picture #13). We find ourselves in a great hall, there are many [[Ghost]]s and [[Demon Skeleton]]s here. We head north. | |||
[[File:Banshe Quest1.PNG]] | [[File:Banshe Quest1.PNG]] | ||
On the large stone, or more precisely in front of it, we spill blood, then go to the fire. | *On the large stone, or more precisely in front of it, we spill blood, then go to the fire. | ||
We go up the stairs to the top, and follow the map...(picture #14) We go down. | *We go up the stairs to the top, and follow the map...(picture #14) We go down. | ||
[[File:Banshe Quest2.PNG]] | |||
NOTE!!! IF YOU GO DOWN YOU WON'T COME OUT AGAIN UNTIL YOU KILL THE MONSTERS! | <span style="color:red;>ATTENTION !</span> Here are [[Warlock]]s 2 per person ! | ||
*Once we kill them , we go up to the five levers (image #15). We move them in the following order: | |||
<b>LEVER 2</b></br> | |||
<b>LEVER 4</b></br> | |||
<b>LEVER 3</b></br> | |||
<b>LEVER 1</b></br> | |||
<b>RESPONSE 5</b></br> | |||
*Enter the teleport. We head in to these stairs: picture #16. We go down, walk ahead and encounter two [[Giant Spider]]s. Continue following the arrow and use the pick at the place marked with a blue dot (Image No. 17). We continue to follow the map. Image No. 18 marks the place where we need to use the pick again. We pass a large room in the fire, where [[Demon Skeleton]]s prowl. When we are near the teleport, we put a [[Black Pearl]] on the stone on the right, and on the left, a [[White Pearl]] (Image No. 19). We enter the teleport. | |||
*The last part, it's time to visit [[The Queen of the Banshee]] (Image No. 20) - we go downstairs. | |||
<span style="color:red;>CAUTION !!!</span> There are 4 [[Banshee]] at the bottom ! | |||
*When you kill the monsters, talk to [[The Queen of the Banshee]], for the conversation to succeed 60 lvl is required: | |||
<b>Conversation:</b> | |||
{| class="wikitable" style="font-weight:bold; background-color:#595959; color:#C1C1C1;" | |||
|- | |||
| style="color: yellow; font-weight: normal;" | Player: | |||
| style="vertical-align:middle; background-color:#4C4C4C; font-weight:normal; color: yellow;" | Hi. | |||
|- | |||
| style="color: yellow; font-weight: normal;" | Player: | |||
| style="vertical-align:middle; background-color:#4C4C4C; font-weight:normal; color: yellow;" | Seventh Seal. | |||
|- | |||
| style="color: yellow; font-weight: normal;" | Player: | |||
| style="vertical-align:middle; background-color:#4C4C4C; font-weight:normal; color: yellow;" | Yes. | |||
|- | |||
| style="color: yellow; font-weight: normal;" | Player: | |||
| style="vertical-align:middle; background-color:#4C4C4C; font-weight:normal; color: yellow;" | Yes | |||
|- | |||
| style="color: yellow; font-weight: normal;" | Player: | |||
| style="vertical-align:middle; background-color:#4C4C4C; font-weight:normal; color: yellow;" | Yes | |||
|- | |||
| style="color: yellow; font-weight: normal;" | Player: | |||
| style="vertical-align:middle; background-color:#4C4C4C; font-weight:normal; color: yellow;" | Yes | |||
|- | |||
| style="color: yellow; font-weight: normal;" | Player: | |||
| style="vertical-align:middle; background-color:#4C4C4C; font-weight:normal; color: yellow;" | Yes | |||
|- | |||
| style="color: yellow; font-weight: normal;" | Player: | |||
| style="vertical-align:middle; background-color:#4C4C4C; font-weight:normal; color: yellow;" | Yes | |||
|- | |||
| style="color: yellow; font-weight: normal;" | Player: | |||
| style="vertical-align:middle; background-color:#4C4C4C; font-weight:normal; color: yellow;" | Kiss | |||
|- | |||
| style="color: yellow; font-weight: normal;" | Player: | |||
| style="vertical-align:middle; background-color:#4C4C4C; font-weight:normal; color: yellow;" | Yes. | |||
|} | |||
*We are teleported, to our grave, or more precisely to our corpse. We come to the surface, go to [[Ghostland]] again (this time we can go through [[Isle of Kings]], but in order to go underground you must at least start the [[Blessed Ankh Quest]]) and go to Queen Banshee again. | |||
*Kill the [[Banshee]] near the Queen and go through some doors (image #21). At the end, we go down. | |||
<span style="color:red;>NOTE!!!</span> IF YOU GO DOWN YOU WON'T COME OUT AGAIN UNTIL YOU KILL THE MONSTERS! | |||
*At the bottom there are: 6 [[Banshee]], 2 [[Dragon Lord]]s and 2 [[Giant Spider]]s. Kill the monsters and take the rewards from the crates in the corners of the room and in the middle. We return through the teleport at the bottom. | |||
[[Category: Quests]] | |||
Latest revision as of 10:25, 25 November 2024
Name: The Banshee Quest.
Location: Undergrounds of the Isle of Kings
Required level: 60
Reward: 100 Platinum Coin, Boots of Haste, Giant Sword, Stone Skin Amulet, Tower Shield, Stealth Ring.
Monsters: Scorpion, Skeleton, Ghoul, Stalker, Ghost, Mummy, Demon Skeleton, Banshee, Giant Spider, Dragon Lord, Warlock.
Spoiler:
Requirements:
Started Blessed Ankh Quest to be able to descend into the monastery catacombs on Isle of Kings.
Completed Family Brooch Quest to get to Isle of Kings.
![]() Rope or Magic Rope spell
Rope or Magic Rope spell
![]() Black Pearl (one per person)
Black Pearl (one per person)
![]() White Pearl (one per person)
White Pearl (one per person)
![]() Pick
Pick
![]() Vial of Blood (one per person)
Vial of Blood (one per person)
Description:
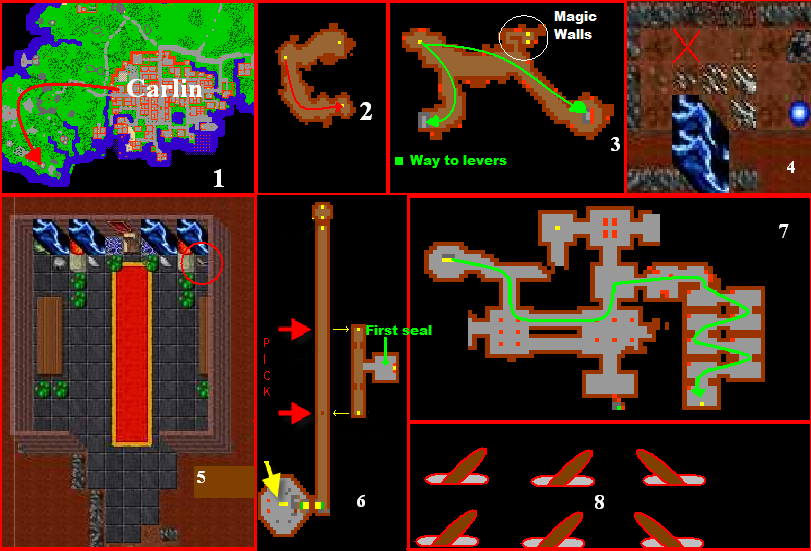
- At the beginning, we go to Ghostland (image 1). We go down, cross the square and go down once more. Then we follow the arrow (image #2).
- To get to the hole behind the magic walls, we need to move two levers, which are located southwest and east of our hole (green arrows). The levers are protected by Giant Spider (to the right) (NOTE!!! once you enter the room with them the bars will close behind you), Demon Skeletons, Ghouls and some Scorpions (to the left). When you switch them we return to magic walls again (NOTE!!! if there are more than five going, remember that on the sixth field behind magic walls there is a place causing them to reappear - Image 4). Enter the hole then go to the room. Next to the throne there is a lever marked in red(Image 5).
- Under the throne lies a body and in it a book, needed for the Blessed Ankh Quest.
- Move it, and go down to the room with the teleport, enter it, and find yourself on the other side. We go to 1/3 of the length of the corridor and use the Pick (image #6 first red arrow), enter the resulting hole go down. There you will see a blue flame, enter it causing 2 Ghosts and a Demon Skeleton to appear. The fire teleports to a room with another fire, you should enter it (return). We go to the south of the corridor and use the rope to go further south to the stairs (on the 2nd side 4 Demon Skeletons, 3 Stalkers and 3 Ghosts are waiting for us. We go down the stairs. We appear in an intricate corridor (picture #7). After a while we find ourselves in a room with levers. We move them as in image #8, and enter the "fire".
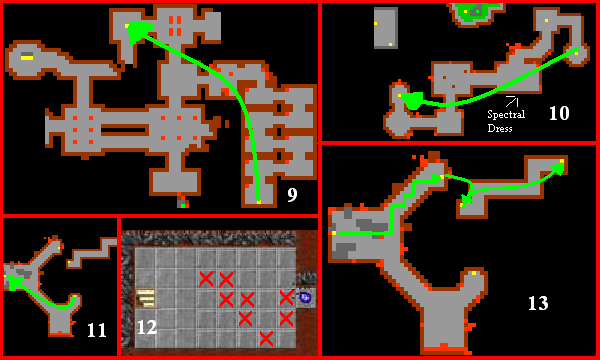
- Head to the stairs (image #9), on the way you will encounter Mummys, Ghouls and the like. Once you are on the floor below, head here (image #10).
WARNING!!! On the way you will meet, about 10 Banshee and some Stalkers!
- We continue to follow the arrow (image #11). We go, up and have to go through the stones in a special order: (We only stand on X - picture #12!) Then we follow the arrow (picture #13). We find ourselves in a great hall, there are many Ghosts and Demon Skeletons here. We head north.
- On the large stone, or more precisely in front of it, we spill blood, then go to the fire.
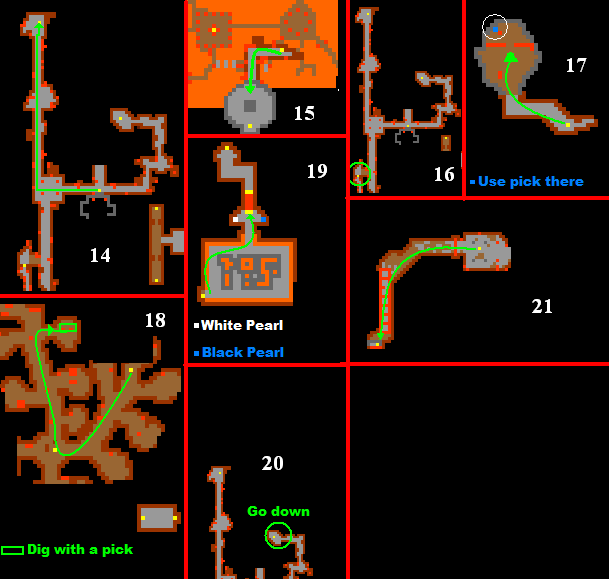
- We go up the stairs to the top, and follow the map...(picture #14) We go down.
ATTENTION ! Here are Warlocks 2 per person !
- Once we kill them , we go up to the five levers (image #15). We move them in the following order:
LEVER 2
LEVER 4
LEVER 3
LEVER 1
RESPONSE 5
- Enter the teleport. We head in to these stairs: picture #16. We go down, walk ahead and encounter two Giant Spiders. Continue following the arrow and use the pick at the place marked with a blue dot (Image No. 17). We continue to follow the map. Image No. 18 marks the place where we need to use the pick again. We pass a large room in the fire, where Demon Skeletons prowl. When we are near the teleport, we put a Black Pearl on the stone on the right, and on the left, a White Pearl (Image No. 19). We enter the teleport.
- The last part, it's time to visit The Queen of the Banshee (Image No. 20) - we go downstairs.
CAUTION !!! There are 4 Banshee at the bottom !
- When you kill the monsters, talk to The Queen of the Banshee, for the conversation to succeed 60 lvl is required:
Conversation:
| Player: | Hi. |
| Player: | Seventh Seal. |
| Player: | Yes. |
| Player: | Yes |
| Player: | Yes |
| Player: | Yes |
| Player: | Yes |
| Player: | Yes |
| Player: | Kiss |
| Player: | Yes. |
- We are teleported, to our grave, or more precisely to our corpse. We come to the surface, go to Ghostland again (this time we can go through Isle of Kings, but in order to go underground you must at least start the Blessed Ankh Quest) and go to Queen Banshee again.
- Kill the Banshee near the Queen and go through some doors (image #21). At the end, we go down.
NOTE!!! IF YOU GO DOWN YOU WON'T COME OUT AGAIN UNTIL YOU KILL THE MONSTERS!
- At the bottom there are: 6 Banshee, 2 Dragon Lords and 2 Giant Spiders. Kill the monsters and take the rewards from the crates in the corners of the room and in the middle. We return through the teleport at the bottom.


