Double Hero Quest: Difference between revisions
From Realera Wiki
(Created page with " We go to the Edron to Hero Cave. We start from the ship and follow the map (to kill: Wolf, Hunter, Wild Warrior, a couple of Bear and Wolf): File:HeroCaveM1.png File:HeroCaveM2.png Then we have to go through numerous underground corridors (a rope will come in handy) meeting along the way: Wild Warriors: File:Hc1.jpg Demon Skeletons, Wild Warriors, Priestesses, Ghouls and Beholders surrounded by Skele...") |
No edit summary |
||
| (One intermediate revision by the same user not shown) | |||
| Line 1: | Line 1: | ||
<b>Name:</b> Double Hero Quest.</br> | |||
<b>Location:</b> [[Hero Cave]] on [[Edron]].</br> | |||
<b>Reward:</b> [[Club Ring]], [[Red Gem]].</br> | |||
<b>Monsters:</b> [[Beholder]], [[Monk]], [[Demon Skeleton]], [[Orc Shaman]], [[Wild Warrior]], [[Hunter]], [[Priestess]], [[Dragon]], [[Hero]].</br> | |||
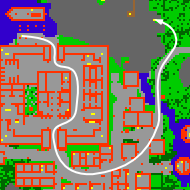
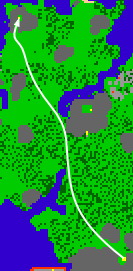
We go to the [[Edron]] to [[Hero Cave]]. We start from the ship and follow the map (to kill: [[Wolf]], [[Hunter]], [[Wild Warrior]], a couple of [[Bear]] and [[Wolf]]): | |||
==<span style="font-size:150%;">Spoiler:</span>== | |||
*We go to the [[Edron]] to [[Hero Cave]]. We start from the ship and follow the map (to kill: [[Wolf]], [[Hunter]], [[Wild Warrior]], a couple of [[Bear]] and [[Wolf]]): | |||
[[File:HeroCaveM1.png]] [[File:HeroCaveM2.png]] | [[File:HeroCaveM1.png]] [[File:HeroCaveM2.png]] | ||
*Then we have to go through numerous underground corridors (a rope will come in handy) meeting along the way: | |||
[[Wild Warrior]]s: | [[Wild Warrior]]s: | ||
[[File:Hc1.jpg]] | [[File:Hc1.jpg]] | ||
[[Demon Skeleton]]s, [[Wild Warrior]]s, [[Priestess]]es, [[Ghoul]]s and [[Beholder]]s surrounded by [[Skeleton]]s: | [[Demon Skeleton]]s, [[Wild Warrior]]s, [[Priestess]]es, [[Ghoul]]s and [[Beholder]]s surrounded by [[Skeleton]]s: | ||
[[File:Hc2.jpg]] | [[File:Hc2.jpg]] | ||
[[Monk]]s, [[Demon Skeleton]], [[Wild Warrior]]s: | [[Monk]]s, [[Demon Skeleton]], [[Wild Warrior]]s: | ||
[[File:Hc3.jpg]] | [[File:Hc3.jpg]] | ||
[[Dragon]]s: | [[Dragon]]s: | ||
[[File:Hc4.jpg]] | [[File:Hc4.jpg]] | ||
[[Monk]]s, [[Hero]], [[Demon Skeleton]], and [[Beholder]]s: | [[Monk]]s, [[Hero]], [[Demon Skeleton]], and [[Beholder]]s: | ||
[[File:DhQ2.png]] | [[File:DhQ2.png]] | ||
[[Wild Warrior]]s, [[Monk]]s, [[Priestess]]es, [[Orc Shaman]], [[Demon Skeleton]], 2 [[Hero]] | [[Wild Warrior]]s, [[Monk]]s, [[Priestess]]es, [[Orc Shaman]], [[Demon Skeleton]], 2 [[Hero]] | ||
| Line 30: | Line 41: | ||
[[File:DhQ3.png]] | [[File:DhQ3.png]] | ||
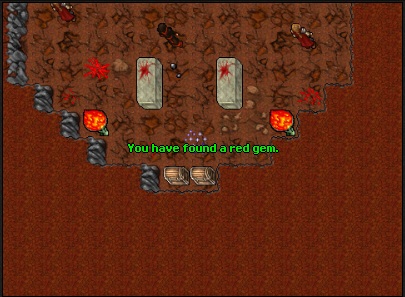
After killing the enemies go to the south wall and take the rewards from the crate | |||
*After killing the enemies go to the south wall and take the rewards from the crate | |||
[[File:DHeroQ2B.jpg]] | [[File:DHeroQ2B.jpg]] | ||
Latest revision as of 13:08, 17 September 2024
Name: Double Hero Quest.
Location: Hero Cave on Edron.
Reward: Club Ring, Red Gem.
Monsters: Beholder, Monk, Demon Skeleton, Orc Shaman, Wild Warrior, Hunter, Priestess, Dragon, Hero.
Spoiler:
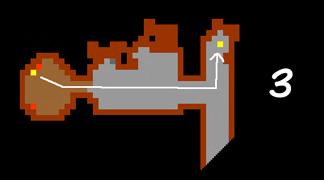
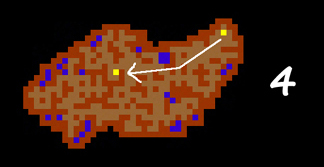
- We go to the Edron to Hero Cave. We start from the ship and follow the map (to kill: Wolf, Hunter, Wild Warrior, a couple of Bear and Wolf):
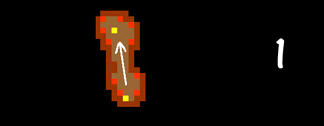
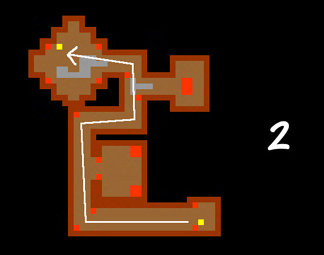
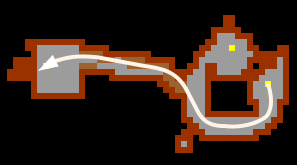
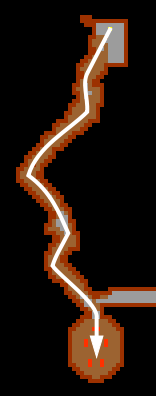
- Then we have to go through numerous underground corridors (a rope will come in handy) meeting along the way:
Demon Skeletons, Wild Warriors, Priestesses, Ghouls and Beholders surrounded by Skeletons:
Monks, Demon Skeleton, Wild Warriors:
Monks, Hero, Demon Skeleton, and Beholders:
Wild Warriors, Monks, Priestesses, Orc Shaman, Demon Skeleton, 2 Hero
- After killing the enemies go to the south wall and take the rewards from the crate
