Annihilator Quest: Difference between revisions
From Realera Wiki
No edit summary |
No edit summary |
||
| (3 intermediate revisions by the same user not shown) | |||
| Line 1: | Line 1: | ||
<b>Name:</b> Annihilator Quest.</br> | <b>Name:</b> Annihilator Quest.</br> | ||
<b>Location:</b> Cave of [[ | <b>Location:</b> Cave of [[Hero]]es on [[Edron]]</br> | ||
<b>Reward:</b> Choose one from: [[Magic Sword]], [[Stonecutter Axe]], [[Demon Armor]], [[Present Box]] containing [[ | <b>Reward:</b> Choose one from: [[Magic Sword]], [[Stonecutter Axe]], [[Demon Armor]], [[Present Box]] containing [[Annihilator Bear]].</br> | ||
<b>Required level:</b> 100.</br> | <b>Required level:</b> 100.</br> | ||
<b>Monsters:</b> [[Hunter]], [[Demon Skeleton]], [[Monk]], [[Dark Magician]], [[Priestess]], [[Hero]], [[Demon]].</br> | <b>Monsters:</b> [[Hunter]], [[Demon Skeleton]], [[Monk]], [[Dark Magician]], [[Priestess]], [[Hero]], [[Demon]].</br> | ||
<span style="font-size: | ==<span style="font-size:150%;">Spoiler:</span>== | ||
<span style="font-size:140%;"><b>Requirements:</b></span></br> | |||
*Four people (preferably above lvl 130 each).</br> | |||
*Useful are: [[Ultimate Healing Rune]]s, [[Mana Fluid]]s, [[Might Ring]]s, [[Stone Skin Amulet]]s, [[Elven Amulet]]s, [[Garlic Necklace]]s (gives partial protection from the destructive wave of [[Demon]]s).</br> | |||
---- | |||
<span style="font-size:140%;"><b>Description:</b></span></br> | |||
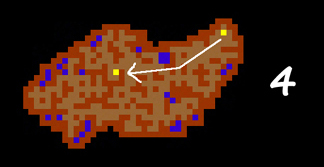
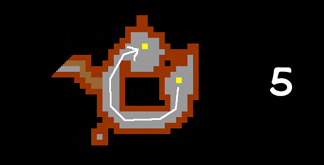
*First, the group heads to [[Hero Cave]] on [[Edron]] by following the path marked below: | |||
<span style="font-size: | |||
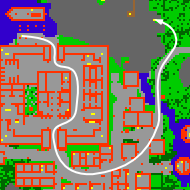
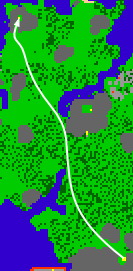
First, the group heads to [[Hero Cave]] on [[Edron]] by following the path marked below: | |||
[[File:HeroCaveM1.png]] [[File:HeroCaveM2.png]] | [[File:HeroCaveM1.png]] [[File:HeroCaveM2.png]] | ||
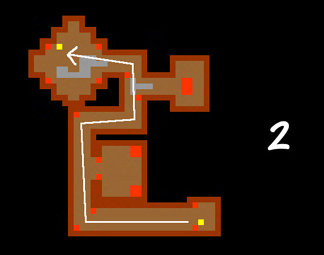
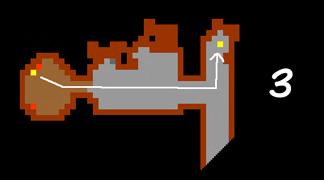
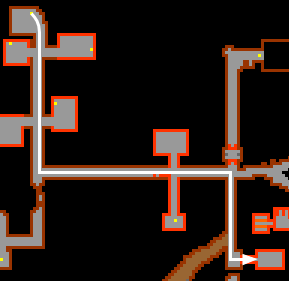
*Then they must walk through numerous underground corridors meeting along the way: | |||
[[Wild Warrior]]s: | [[Wild Warrior]]s: | ||
[[File:Hc1.jpg]] | [[File:Hc1.jpg]] | ||
[[Skeleton | |||
[[Demon Skeleton]]s, [[Wild Warrior]]s, [[Priestess]]es, [[Ghoul]]s, and [[Beholder]]s surrounded by [[Skeleton]]s: | |||
[[File:Hc2.jpg]] | [[File:Hc2.jpg]] | ||
[[Monk]]s, [[ | |||
[[Monk]]s, [[Demon Skeleton]]s, [[Wild Warrior]]s: | |||
[[File:Hc3.jpg]] | [[File:Hc3.jpg]] | ||
[[Dragon]]s: | [[Dragon]]s: | ||
[[File:Hc4.jpg]] | [[File:Hc4.jpg]] | ||
[[Monk]]s, [[Hero]], [[Dark Magician]]s: | [[Monk]]s, [[Hero]], [[Dark Magician]]s: | ||
[[File:Hc5.jpg]] | [[File:Hc5.jpg]] | ||
[[Priestess]]es, [[Demon Skeleton]]s, [[Wild Warrior]]s, [[Hunter]]s, [[Minotaur Mage]], [[Minotaur Guard]]s, [[Ghoul]]s, [[Stalker]]s: | [[Priestess]]es, [[Demon Skeleton]]s, [[Wild Warrior]]s, [[Hunter]]s, [[Minotaur Mage]], [[Minotaur Guard]]s, [[Ghoul]]s, [[Stalker]]s: | ||
| Line 43: | Line 48: | ||
[[File:Anihi1.png]] | [[File:Anihi1.png]] | ||
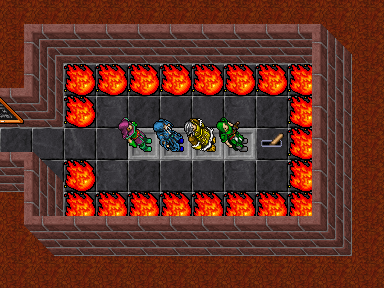
Once there, the group should find a room behind a level gate, and inside it, four boxes and a lever. All four daredevils should stand on the fields (the strongest knights at the beginning, that is, closer to the lever), and when they are ready, pull the lever to the left (it can be used only once a day, so if it is already set to the left, it means that someone has already used it today and you have to try to complete the quest the next day): | |||
*Once there, the group should find a room behind a level gate, and inside it, four boxes and a lever. All four daredevils should stand on the fields (the strongest knights at the beginning, that is, closer to the lever), and when they are ready, pull the lever to the left (it can be used only once a day, so if it is already set to the left, it means that someone has already used it today and you have to try to complete the quest the next day): | |||
[[File:Anihi2.png]] | [[File:Anihi2.png]] | ||
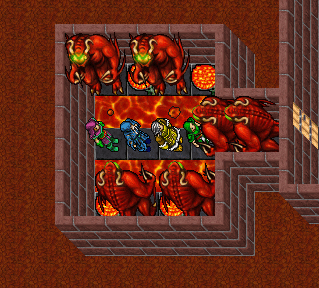
The group will be taken to a cramped room with 6 [[Demon]]s, 2 of which block the way forward - only they need to be killed to move on: | |||
*The group will be taken to a cramped room with 6 [[Demon]]s, 2 of which block the way forward - only they need to be killed to move on: | |||
[[File:Anihi3.png]] | [[File:Anihi3.png]] | ||
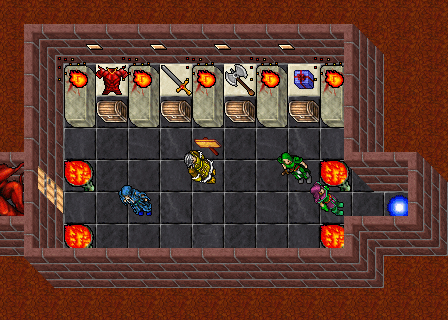
Once these 2 [[Demon]]s are defeated, DO NOT move on quickly, step by step you approach the reward room, carefully watching your life level and constantly healing quickly to get to the reward room. Everyone can choose only one of the four rewards. Once he takes one, he should head to the teleport on the right, which will take him under the level gate: | |||
*Once these 2 [[Demon]]s are defeated, DO NOT move on quickly, step by step you approach the reward room, carefully watching your life level and constantly healing quickly to get to the reward room. Everyone can choose only one of the four rewards. Once he takes one, he should head to the teleport on the right, which will take him under the level gate: | |||
[[File:Anihi4.png]] | [[File:Anihi4.png]] | ||
Latest revision as of 12:31, 16 September 2024
Name: Annihilator Quest.
Location: Cave of Heroes on Edron
Reward: Choose one from: Magic Sword, Stonecutter Axe, Demon Armor, Present Box containing Annihilator Bear.
Required level: 100.
Monsters: Hunter, Demon Skeleton, Monk, Dark Magician, Priestess, Hero, Demon.
Spoiler:
Requirements:
- Four people (preferably above lvl 130 each).
- Useful are: Ultimate Healing Runes, Mana Fluids, Might Rings, Stone Skin Amulets, Elven Amulets, Garlic Necklaces (gives partial protection from the destructive wave of Demons).
Description:
- Then they must walk through numerous underground corridors meeting along the way:
Demon Skeletons, Wild Warriors, Priestesses, Ghouls, and Beholders surrounded by Skeletons:
Monks, Demon Skeletons, Wild Warriors:
Priestesses, Demon Skeletons, Wild Warriors, Hunters, Minotaur Mage, Minotaur Guards, Ghouls, Stalkers:
- Once there, the group should find a room behind a level gate, and inside it, four boxes and a lever. All four daredevils should stand on the fields (the strongest knights at the beginning, that is, closer to the lever), and when they are ready, pull the lever to the left (it can be used only once a day, so if it is already set to the left, it means that someone has already used it today and you have to try to complete the quest the next day):
- The group will be taken to a cramped room with 6 Demons, 2 of which block the way forward - only they need to be killed to move on:
- Once these 2 Demons are defeated, DO NOT move on quickly, step by step you approach the reward room, carefully watching your life level and constantly healing quickly to get to the reward room. Everyone can choose only one of the four rewards. Once he takes one, he should head to the teleport on the right, which will take him under the level gate:
