Helmet of the Ancients Quest: Difference between revisions
No edit summary |
No edit summary |
||
| (24 intermediate revisions by the same user not shown) | |||
| Line 5: | Line 5: | ||
<b>Monsters:</b> [[Dipthrah]], [[Omruc]], [[Thalas]], [[Vashresamun]], [[Morguthis]], [[Mahrdis]], [[Ashmunrah]], [[Rahemos]] and their servants.</br> | <b>Monsters:</b> [[Dipthrah]], [[Omruc]], [[Thalas]], [[Vashresamun]], [[Morguthis]], [[Mahrdis]], [[Ashmunrah]], [[Rahemos]] and their servants.</br> | ||
==<span style="font-size:150%;">Spoiler:</span>== | |||
<span style="font-size:140%;"><b>Items needed:</b></span></br> | |||
[[File:Rope.gif]] [[Rope]]</br> | [[File:Rope.gif]] [[Rope]]</br> | ||
[[File:Shovel.gif]] [[Shovel]]</br> | [[File:Shovel.gif]] [[Shovel]]</br> | ||
[[File:Scarab Coin.gif]] About 8 [[Scarab Coin]]</br> | [[File:Scarab Coin.gif]] About 8 [[Scarab Coin]]</br> | ||
---- | |||
<span style="font-size: | <span style="font-size:140%;"><b>Introductory information:</b></span></br> | ||
*Each Pharaoh leaves behind a different special item. After defeating a Pharaoh, a teleport appears, thanks to which (if you have this special item) you will appear in a room with the sarcophagus of a given Pharaoh, and in it one of the parts for [[Helmet of the Ancients]]. On the other hand, those players who do not have the item will return to the entrance to the given Tomb. Each of the Pharaohs is in a different Tomb, in order to get to it, you need to dig out a hidden entrance with a [[Shovel]]. At certain points to enter deeper into the tomba, we will come to an empty coal basin, and next to it mystic flame. You should then stand on the flame, and place one [[Scarab Coin]] on the altar. The quest is divided into 8 missions, 7 of which are performed under [[Ankrahmun]] Desert, and one (the last one) under the city of [[Ankrahmun]] itself. | |||
---- | |||
<span style="font-size:140%;"><b>Mission 1 - [[Vashresamun]] - [[Ancient Ruins Tomb]]:</b></span></br> | |||
*To reach the [[Vashresamun]] Tomb, you need to find the [[Ancient Ruins Tomb]]: | |||
[[File:TAncientRuins.png]] | |||
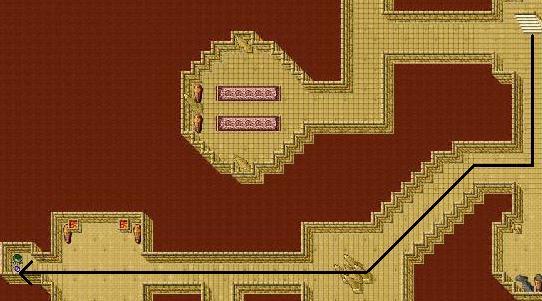
*Take the road as shown on the maps: | |||
Take the road as shown on the maps: | |||
[[File:Hota1.jpg]] | [[File:Hota1.jpg]] | ||
| Line 27: | Line 29: | ||
[[File:Hota2.jpg]] | [[File:Hota2.jpg]] | ||
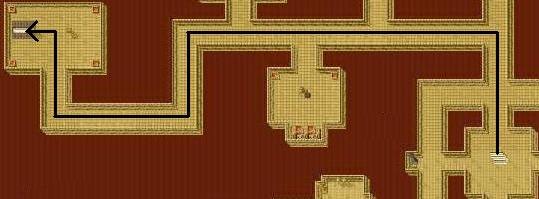
Go all the way down until you reach the | |||
The path on the first level after the teleport looks like this: | *Go all the way down until you reach the coal basin teleport (how to use it is written above). | ||
*The path on the first level after the teleport looks like this: | |||
[[File:Hota3.jpg]] | [[File:Hota3.jpg]] | ||
Here we will meet [[Stalker]]s, 2-3 [[Ghost]]s and a [[Bonebeast]] | |||
Go down a floor below and head west, as in the map: | *Here we will meet [[Stalker]]s, 2-3 [[Ghost]]s and a [[Bonebeast]] | ||
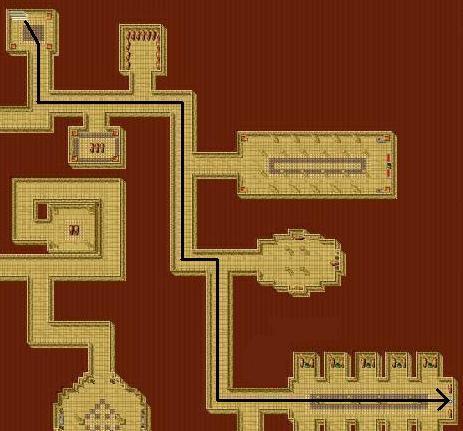
*Go down a floor below and head west, as in the map: | |||
[[File:Hota4.jpg]] | [[File:Hota4.jpg]] | ||
Along the way [[Vampire]], [[Demon Skeleton]]s and [[Mummy]]. On the "last straight" there will already be a slight foretaste of the | |||
At the end of the corridor we enter the teleport, and solve the musical puzzle. In a nutshell, it consists in the fact that we are to play 5 instruments in the correct order. The difficulty is that there are more instruments. It should be done in the following order: | *Along the way [[Vampire]], [[Demon Skeleton]]s and [[Mummy]]. On the "last straight" there will already be a slight foretaste of the Pharaoh. We will meet 2-3 [[Banshee]] with a [[Lich]] and [[Ghost]]s encampment. | ||
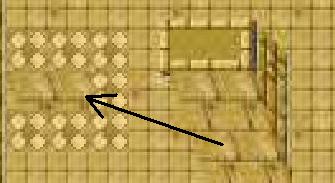
*At the end of the corridor we enter the teleport, and solve the musical puzzle. In a nutshell, it consists in the fact that we are to play 5 instruments in the correct order. The difficulty is that there are more instruments. It should be done in the following order: | |||
[[File:Hota5.jpg]] | [[File:Hota5.jpg]] | ||
Enter the next teleport and meet [[ | *Enter the next teleport and meet [[Vashresamun]], 2-4 [[Banshee]], 4 Magicthrower and 2 Shredderthrower. To kill it, it is best to ask high-level mates, the Blocker should be at least level 100. The tactics are simple: the Knight enters first and stands with the Pharaoh in the middle of the room. Then a Druid should enter, who uses the heal friend spell to heal the blocker, and a Sorcerer equipped with the energy wave spell. | ||
*When you kill a boss you will loot a special item: [[Blue Note]], the person who has it will be able to jump into a teleport that will teleport him to the room with Part of the helmet: [[Left Horn]]. | |||
---- | |||
<span style="font-size:140%;"><b>Mission 2 - [[Rahemos]] - [[Oasis Tomb]]:</b></span></br> | |||
*The entrance to [[Oasis Tomb]] is located in the west of the desert: | |||
[[File:TOasis.png]] | |||
After entering, we go exactly as the map below leads us: | *After entering, we go exactly as the map below leads us: | ||
[[File:Hota6.jpg]] | [[File:Hota6.jpg]] | ||
| Line 58: | Line 63: | ||
[[File:Hota7.jpg]] | [[File:Hota7.jpg]] | ||
We go down the stairs to the bottom. We go north, fighting the [[Vampire]] and [[Ghost]]s. | |||
*We go down the stairs to the bottom. We go north, fighting the [[Vampire]] and [[Ghost]]s. | |||
[[File:Hota8.jpg]] | [[File:Hota8.jpg]] | ||
| Line 64: | Line 70: | ||
[[File:Hota9.jpg]] | [[File:Hota9.jpg]] | ||
At the last chamber we will be attacked by [[Beholder]]s, [[Necromancer]]s and 5 [[Green Djinn]]. There is no getting around the use of the [[Dwarven Ring]]. Continuing to the right, towards the tp, we meet a [[Warlock]], who is best pushed between the coffin and the teleport, which will prevent him from escaping. Kill him, and move on. | |||
*At the last chamber we will be attacked by [[Beholder]]s, [[Necromancer]]s and 5 [[Green Djinn]]. There is no getting around the use of the [[Dwarven Ring]]. Continuing to the right, towards the tp, we meet a [[Warlock]], who is best pushed between the coffin and the teleport, which will prevent him from escaping. Kill him, and move on. | |||
[[File:Hota10.jpg]] | [[File:Hota10.jpg]] | ||
We are taken to a room with a task that we perform only once (it stays forever). To go behind the door with the red flashing handle, click on the levers on the left until a carrot appears to us instead of a hat. | |||
Go through the door, where the second part of the task awaits us. Note!!! You can not move the levers that are located in each room. The fun is to go to the second part of the chamber. Each wall, as soon as you enter it - disappears. Below is shown how this should be done: | *We are taken to a room with a task that we perform only once (it stays forever). To go behind the door with the red flashing handle, click on the levers on the left until a carrot appears to us instead of a hat. | ||
*Go through the door, where the second part of the task awaits us. Note!!! You can not move the levers that are located in each room. The fun is to go to the second part of the chamber. Each wall, as soon as you enter it - disappears. *Below is shown how this should be done: | |||
[[File:Hota11.jpg]] [[File:Hota12.jpg]] | [[File:Hota11.jpg]] [[File:Hota12.jpg]] | ||
Once we have made it through the second part of the puzzle, we are shown a wide ramp that leads to the room with 9 [[Demon (Goblin)]]. | *Once we have made it through the second part of the puzzle, we are shown a wide ramp that leads to the room with 9 [[Demon (Goblin)]]. | ||
We enter the teleport to confront: [[Warlock]] and [[Rahemos]], who summons [[Demon]]s. In the middle of the room stands the | *We enter the teleport to confront: [[Warlock]] and [[Rahemos]], who summons [[Demon]]s. In the middle of the room stands the Magicthrower. The fastest way to kill [[Rahemos]] is to have a high-level Knight (+150 lvl), a Druid who uses the heal friend spell and a Paladin. Since this monster has almost no defense against physical attacks, the Knight uses the fFierce berserk spell and the Paladin fires [[Assassin Star]]s. | ||
*When you kill a boss you will loot a special item: [[Ancient Rune]], the person who has it will be able to jump into a teleport that will teleport him to the room with Part of the helmet: [[Helmet Piece]]. | |||
---- | |||
<span style="font-size:140%;"><b>Mission 3 - [[Omruc]] - [[Penisula Tomb]]:</b></span></br> | |||
*To enter [[Penisula Tomb]] we need to go to the southwest of [[Ankrahmun]] town: | |||
[[File:Penisula Tomb.png]] | |||
*We move according to the map: | |||
We move according to the map: | |||
[[File:Hota13.jpg]] | [[File:Hota13.jpg]] | ||
| Line 90: | Line 98: | ||
[[File:Hota14.jpg]] [[File:Hota15.jpg]] | [[File:Hota14.jpg]] [[File:Hota15.jpg]] | ||
Throughout this route we will come face to face with large numbers of [[Vampire]], [[Mummy]], [[Ghost]]s and [[Demon Skeleton]]s. Towards the end of the route we will additionally encounter Ancient Scaraba and Necromancers. | |||
After entering the tp, we encounter another obstacle. Invisible walls stand in our way, the route shown below: | *Throughout this route we will come face to face with large numbers of [[Vampire]], [[Mummy]], [[Ghost]]s and [[Demon Skeleton]]s. Towards the end of the route we will additionally encounter Ancient Scaraba and Necromancers. | ||
*After entering the tp, we encounter another obstacle. Invisible walls stand in our way, the route shown below: | |||
[[File:Hota16.jpg]] | [[File:Hota16.jpg]] | ||
We enter the tp to face: 6 Magicthrowers and 6 Shredderthrowers, as well as Omruc, who often becomes invisible. To defeat the Pharaoh we will need Avalanche | *We enter the tp to face: 6 Magicthrowers and 6 Shredderthrowers, as well as Omruc, who often becomes invisible. To defeat the Pharaoh we will need [[Avalanche Rune]]s. The help of a Druid with the spell Heal Friend will be very useful. | ||
*When you kill a boss you will loot a special item: [[Crystal Arrow]], the person who has it will be able to jump into a teleport that will teleport him to the room with Part of the helmet: [[Helmet Adornment]]. | |||
---- | |||
<span style="font-size:140%;"><b>Mission 4 - [[Dipthrah]] - [[Mountain Tomb]]:</b></span></br> | |||
*Entrance to the tomb: | |||
[[File:TMountain.png]] | |||
We go as the map indicates: | *We go as the map indicates: | ||
[[File:Hota17.jpg]] | [[File:Hota17.jpg]] | ||
Descend all the way down until you reach the teleport, at which you place [[Scarab Coin]] on the altar - proceed further. After passing through the barrier, pull 11 levers. The order is arbitrary. The levers are marked with yellow circles: | |||
*Descend all the way down until you reach the teleport, at which you place [[Scarab Coin]] on the altar - proceed further. After passing through the barrier, pull 11 levers. The order is arbitrary. The levers are marked with yellow circles: | |||
[[File:Hota18.jpg]] | [[File:Hota18.jpg]] | ||
After dragging all of them to the right side, the teleport (blue circle) will unlock, and allow you to move on: | |||
*After dragging all of them to the right side, the teleport (blue circle) will unlock, and allow you to move on: | |||
[[File:Hota19.jpg]] | [[File:Hota19.jpg]] | ||
Enter the | |||
*Enter the teleport, go south and then east. There we encounter walls with 3 pairs of doors. It is important to go through them in the right way: | |||
[[File:Hota20.jpg]] | [[File:Hota20.jpg]] | ||
We enter the | *We enter the teleport, to meet [[Dipthrah]]. There are 9 magicthrowers spread around the room. The blocker escapes with the Pharaoh to the south of the room, and the Sorcerers using the energy wave spell killing him. | ||
*When you kill a boss you will loot a special item: [[Ornamented Ankh]], the person who has it will be able to jump into a teleport that will teleport him to the room with Part of the helmet: [[Damaged Helmet]]. | |||
---- | |||
<span style="font-size:140%;"><b>Mission 5 - [[Mahrdis]] - [[Shadow Tomb]]:</b></span></br> | |||
*[[Mahrdis]] is located in [[Shadow Tomb]], east of [[Ankrahmun]]: | |||
[[File:TShadow.png]] | |||
*Once we entered the tomb, we go all the way down to level 6, where we go behind the teleport. Behind the tp we go down to level 7 and go a piece to the east, where we go lower. Here we follow the map: | |||
[[File:Hota21.jpg]] | |||
In the room marked with a red exclamation mark we will be attacked by 3 [[Dragon]]s, 5 [[Necromancer]]s, a [[Fire Elemental]] and a [[Green Djinn]]. Kill everything, or run past and enter the teleport. | *In the room marked with a red exclamation mark we will be attacked by 3 [[Dragon]]s, 5 [[Necromancer]]s, a [[Fire Elemental]] and a [[Green Djinn]]. Kill everything, or run past and enter the teleport. | ||
Behind the tp we follow the only possible path until we reach strange pink flames. Each of these flames deprives us of 300 HP, so it's best to wait until they disappear and only then start the passage, there is no need to rush, because when we stand in place without fire, the appearance of it does not take away our hp. | *Behind the tp we follow the only possible path until we reach strange pink flames. Each of these flames deprives us of 300 HP, so it's best to wait until they disappear and only then start the passage, there is no need to rush, because when we stand in place without fire, the appearance of it does not take away our hp. | ||
[[File:Hota22.jpg]] | [[File:Hota22.jpg]] | ||
After the fires there is another teleport, leading to a room with [[Mahrdis]], [[Dragon Lord]], 2 [[Dragon]]s and 4 | *After the fires there is another teleport, leading to a room with [[Mahrdis]], [[Dragon Lord]], 2 [[Dragon]]s and 4 Flamethrowers. | ||
To deal with this part of the quest you need to ask a really good Knight for help. Ideally, he should have at least 150 experience level. Once you enter the room the blocker should block [[Mahrdis]] in such a way as to stand between him and the rest of the players. The best and fastest way to kill him is to use the | *To deal with this part of the quest you need to ask a really good Knight for help. Ideally, he should have at least 150 experience level. Once you enter the room the blocker should block [[Mahrdis]] in such a way as to stand between him and the rest of the players. The best and fastest way to kill him is to use the energy wave spell. And when there is no Sorcerer on the team, it is best to use [[Avalanche Rune]]. | ||
*When you kill a boss you will loot a special item: [[Burning Heart]], the person who has it will be able to jump into a teleport that will teleport him to the room with Part of the helmet: <b>Helmet Ornament</b>. | |||
---- | |||
<span style="font-size:140%;"><b>Mission 6 - [[Morguthis]] - [[Tarpit Tomb]]:</b></span></br> | |||
*The sixth part is performed in the [[Tarpit Tomb]]: | |||
[[File:TTarpit.png]] | |||
*We go down to level -6 where we go after tp | |||
[[File:Hota23.jpg]] | |||
Going lower we come across 2 [[Behemoth]]s and some [[Vampire]]s. We go towards the tp as shown on the map: | *Going lower we come across 2 [[Behemoth]]s and some [[Vampire]]s. We go towards the tp as shown on the map: | ||
[[File:Hota24.jpg]] | [[File:Hota24.jpg]] | ||
1. [[File:Hota42.jpg]]</br> | *Now we face a 'maze' style puzzle. Below is the way to beat it. | ||
2. [[File:Hota43.jpg]]</br> | 1). [[File:Hota42.jpg]]</br> | ||
3. Go on the flame and enter the level above.</br> | 2). [[File:Hota43.jpg]]</br> | ||
4. Go up a level higher.</br> | 3). Go on the flame and enter the level above.</br> | ||
5. We go north and go down a level lower.</br> | 4). Go up a level higher.</br> | ||
6. We go east and enter the teleport.</br> | 5). We go north and go down a level lower.</br> | ||
7. [[File:Hota44.jpg]]</br> | 6). We go east and enter the teleport.</br> | ||
7). [[File:Hota44.jpg]]</br> | |||
The blocker blocks [[Deathslicer]] while the rest of the team runs to the sinkhole. | *The blocker blocks [[Deathslicer]] while the rest of the team runs to the sinkhole. | ||
8.We go west and rope yourself.</br> | 8). We go west and rope yourself.</br> | ||
9. Go south and go down a level lower.</br> | 9). Go south and go down a level lower.</br> | ||
10. We go down a level lower.</br> | 10). We go down a level lower.</br> | ||
11. We go east and rope ourselves.</br> | 11). We go east and rope ourselves.</br> | ||
12. We go up to the flame and go down a level lower.</br> | 12). We go up to the flame and go down a level lower.</br> | ||
13. We go north and rope.</br> | 13). We go north and rope.</br> | ||
14. We enter the teleport.</br> | 14). We enter the teleport.</br> | ||
15. [[File:Hota45.jpg]]</br> | 15). [[File:Hota45.jpg]]</br> | ||
The thing is the same as in point 7. | *The thing is the same as in point 7. | ||
16. We go south on the way entering the flame, enter the teleport.</br> | 16). We go south on the way entering the flame, enter the teleport.</br> | ||
17. [[File:Hota46.jpg]]</br> | 17). [[File:Hota46.jpg]]</br> | ||
The blocker paves the way by moving the [[Deathslicer]] south. | *The blocker paves the way by moving the [[Deathslicer]] south. | ||
18. We go down a level below, NOT IN THE TELEPORT!</br> | 18). We go down a level below, NOT IN THE TELEPORT!</br> | ||
19. We go east and rope ourselves.</br> | 19). We go east and rope ourselves.</br> | ||
20. Go north by passing through the flame and enter the teleport.</br> | 20). Go north by passing through the flame and enter the teleport.</br> | ||
21. [[File:Hota47.jpg]]</br> | 21). [[File:Hota47.jpg]]</br> | ||
The blocker runs to the left blocking [[Deathslicer]] while the rest of the team enters the sinkhole. | *The blocker runs to the left blocking [[Deathslicer]] while the rest of the team enters the sinkhole. | ||
22. We go down a level below, NOT IN THE TELEPORT!</br> | 22). We go down a level below, NOT IN THE TELEPORT!</br> | ||
23. Go south and rope yourself.</br> | 23). Go south and rope yourself.</br> | ||
24. We go west, enter the blaze and go north, descend a level lower.</br> | 24). We go west, enter the blaze and go north, descend a level lower.</br> | ||
25. We go southwest and rope.</br> | 25). We go southwest and rope.</br> | ||
26. We go west and rope ourselves.</br> | 26). We go west and rope ourselves.</br> | ||
27. We go south and go down a level lower.</br> | 27). We go south and go down a level lower.</br> | ||
28. Enter the teleport.</br> | 28). Enter the teleport.</br> | ||
29. [[File:Hota48.jpg]]</br> | 29). [[File:Hota48.jpg]]</br> | ||
The blocker runs to the right and blocks the [[Deathslicer]]. The rest of the team passes safely behind his back. | *The blocker runs to the right and blocks the [[Deathslicer]]. The rest of the team passes safely behind his back. | ||
30. Go west NOT IN THE TELEPORT! and go down a floor below.</br> | 30). Go west NOT IN THE TELEPORT! and go down a floor below.</br> | ||
31. We go north passing in front of the flame and rope yourself.</br> | 31). We go north passing in front of the flame and rope yourself.</br> | ||
32. We go north and enter the teleport.</br> | 32). We go north and enter the teleport.</br> | ||
33. [[File:Hota49.jpg]]</br> | 33). [[File:Hota49.jpg]]</br> | ||
We shoot the | *We shoot the magic wall rune so as to cut off the [[Deathslicer]]'s path and descend to the south, where we also encounter a [[Deathslicer]], whom we push into the right alley. The team passes through and descends into the sinkhole on the left. | ||
34. We go down, NOT IN THE TELEPORT!</br> | 34). We go down, NOT IN THE TELEPORT!</br> | ||
35. we go down the alley to the northeast, cross the flame and go south. We rope ourselves.</br> | 35). we go down the alley to the northeast, cross the flame and go south. We rope ourselves.</br> | ||
36. We enter the teleport.</br> | 36). We enter the teleport.</br> | ||
37. [[File:Hota50.jpg]]</br> | 37). [[File:Hota50.jpg]]</br> | ||
Knight blocks [[Deathslicer]] while the rest of the team runs north and enters the sinkhole. | *Knight blocks [[Deathslicer]] while the rest of the team runs north and enters the sinkhole. | ||
38. We go southeast, go through the flame, at the end of the corridor we enter the teleport.</br> | 38). We go southeast, go through the flame, at the end of the corridor we enter the teleport.</br> | ||
39. [[File:Hota51.jpg]]</br> | 39). [[File:Hota51.jpg]]</br> | ||
Knight goes down south pushing [[Deathslicer]]. The rest of the team descends into the sinkhole. | *Knight goes down south pushing [[Deathslicer]]. The rest of the team descends into the sinkhole. | ||
40. We go down, NOT IN THE TELEPORT!</br> | 40). We go down, NOT IN THE TELEPORT!</br> | ||
41. We go as in point #19.</br> | 41). We go as in point #19.</br> | ||
42. We go as in point no. 20</br> | 42). We go as in point no. 20</br> | ||
43. After entering the teleport visible above us, we are transferred directly to | 43). After entering the teleport visible above us, we are transferred directly to Pharaoh.</br> | ||
*Knight, who is the main blocker should trap the pharaoh between the turrets, which will prevent the flip to the rest of the team. Mages using the energy wave spell kill [[Morguthis]]. | |||
*When you kill a boss you will loot a special item: [[Sword Hilt]], the person who has it will be able to jump into a teleport that will teleport him to the room with Part of the helmet: [[Right Horn]]. | |||
---- | |||
<span style="font-size:140%;"><b>Mission 7 - [[Thalas]] - [[Stone Tomb]]:</b></span></br> | |||
*In the penultimate mission we will meet [[Thalas]]. In order to proceed with the seventh mission you need to find the [[Stone Tomb]]: | |||
[[File:TStone.png]] | |||
*Go all the way down to level -6, which is where you go behind the teleport. This is not difficult, as the descents are located right next to each other. We follow the path according to the map: | |||
[[File: | [[File:Hota25.jpg]] | ||
On the next level we will face large numbers of undead monsters. Only in the places marked on the map with AS and GS symbols will we meet more resistance. | *On the next level we will face large numbers of undead monsters. Only in the places marked on the map with AS and GS symbols will we meet more resistance. | ||
[[File:Hota26.jpg]] | [[File:Hota26.jpg]] | ||
There are levers located in places with yellow circles. It is necessary to move them at fairly the same time. Therefore, several are needed for this. If we managed to pull them properly as soon as possible we run to the place marked on the map with a blue circle. Time to enter the teleport is also limited, so all expedition participants should use the | *There are levers located in places with yellow circles. It is necessary to move them at fairly the same time. Therefore, several are needed for this. If we managed to pull them properly as soon as possible we run to the place marked on the map with a blue circle. Time to enter the teleport is also limited, so all expedition participants should use the haste or strong haste spell. Once we have passed behind the tp, a [[Cobra]] surrounded by poison altars and a trellis to stand on appears to our eyes. | ||
Once we step on it, we are quite heavily poisoned, and our life level gradually decreases, starting from 50. However, it is necessary to enter the room with the | *Once we step on it, we are quite heavily poisoned, and our life level gradually decreases, starting from 50. However, it is necessary to enter the room with the Pharaoh, so DO NOT USE the antidote spell! Once everyone is infected, go down the corridor. There is a second [[Cobra]] there, to which we write "Hi", and it takes us to [[Thalas]]. Along with him are 4 [[Necromancer]]s , and a [[Slime]], which he summons himself. It will be best if the Sorcerer uses the energy wave spell to kill him. In addition to the help of undead, [[Thalas]] is supported by 12 plaguethrowers. | ||
*When you kill a boss you will loot a special item: [[Cobrafang Dagger]], the person who has it will be able to jump into a teleport that will teleport him to the room with Part of the helmet: [[Gem Holder]]. | |||
---- | |||
<span style="font-size:140%;">Mission 8 - [[Ashmunrah]] - [[ | <span style="font-size:140%;"><b>Mission 8 - [[Ashmunrah]] - [[Library Tomb]]:</b></span></br> | ||
*If you have already collected 7 parts of the Helmet, go to [[Library Tomb]] to assemble it . Don't forget to bring with you all the parts you have collected so far! | |||
[[File:Hota366.png]] | |||
Follow the path: | *Follow the path: | ||
[[File:Hota37.jpg]] | [[File:Hota37.jpg]] | ||
| Line 264: | Line 278: | ||
[[File:Hota38.jpg]] [[File:Hota39.jpg]] | [[File:Hota38.jpg]] [[File:Hota39.jpg]] | ||
At level -3 go behind tp: | |||
*At level -3 go behind tp: | |||
[[File:Hota40.jpg]] [[File:Hota41.jpg]] | [[File:Hota40.jpg]] [[File:Hota41.jpg]] | ||
After entering the teleport, we are transferred to the last corridor. Along the way we will meet only a dozen more turrets, which cannot be killed or weakened in strength. The first to go is the blocker, who takes the blows from all of them, followed safely by the rest of the team. At the end of the room is a tp, which eventually moves to the pharaoh. | *After entering the teleport, we are transferred to the last corridor. Along the way we will meet only a dozen more turrets, which cannot be killed or weakened in strength. The first to go is the blocker, who takes the blows from all of them, followed safely by the rest of the team. At the end of the room is a tp, which eventually moves to the pharaoh. | ||
In the room with [[Ashmunrah]] (summoning [[Ancient Scarab]]s and [[Green Djinn]]s) there are 4 [[Ghost]]s and [[Behemoth]]. They will need the help of a Druid with the spell | *In the room with [[Ashmunrah]] (summoning [[Ancient Scarab]]s and [[Green Djinn]]s) there are 4 [[Ghost]]s and [[Behemoth]]. They will need the help of a Druid with the spell heal friend. The rest of the team focuses on killing the Pharaoh himself and [[Behemoth]]. For this, it is best to use the energy wave spell. | ||
None of the parts needed to assemble the Helmet fall out of this | *None of the parts needed to assemble the Helmet fall out of this Pharaoh. Therefore, as soon as we have dealt with the fight we leave the room. To do this, you need to drag 5 levers to the right side (they are arranged inside the room). | ||
Each one individually lays all the parts on the altar, and they automatically turn into [[Helmet of the Ancients]] (incomplete). | *Each one individually lays all the parts on the altar, and they automatically turn into [[Helmet of the Ancients]] (incomplete). | ||
*Exit through the teleport. | |||
<span style="color: red;">NOTE!!!</span> To get the full [[Helmet of the Ancients]] you need to put [[Small Ruby]] in [[Helmet of the Ancients]] (incomplete). However, it will return to its original incomplete form after 30 minutes. | |||
[[Category: Quests]] | |||
Latest revision as of 10:30, 25 November 2024
Name: Helmet of the Ancients Quest.
Location: Ankrahmun and surroundings
Reward: Helmet of the Ancients.
Required level: 75.
Monsters: Dipthrah, Omruc, Thalas, Vashresamun, Morguthis, Mahrdis, Ashmunrah, Rahemos and their servants.
Spoiler:
Items needed:
![]() Rope
Rope
![]() Shovel
Shovel
![]() About 8 Scarab Coin
About 8 Scarab Coin
Introductory information:
- Each Pharaoh leaves behind a different special item. After defeating a Pharaoh, a teleport appears, thanks to which (if you have this special item) you will appear in a room with the sarcophagus of a given Pharaoh, and in it one of the parts for Helmet of the Ancients. On the other hand, those players who do not have the item will return to the entrance to the given Tomb. Each of the Pharaohs is in a different Tomb, in order to get to it, you need to dig out a hidden entrance with a Shovel. At certain points to enter deeper into the tomba, we will come to an empty coal basin, and next to it mystic flame. You should then stand on the flame, and place one Scarab Coin on the altar. The quest is divided into 8 missions, 7 of which are performed under Ankrahmun Desert, and one (the last one) under the city of Ankrahmun itself.
Mission 1 - Vashresamun - Ancient Ruins Tomb:
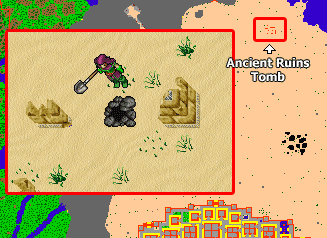
- To reach the Vashresamun Tomb, you need to find the Ancient Ruins Tomb:
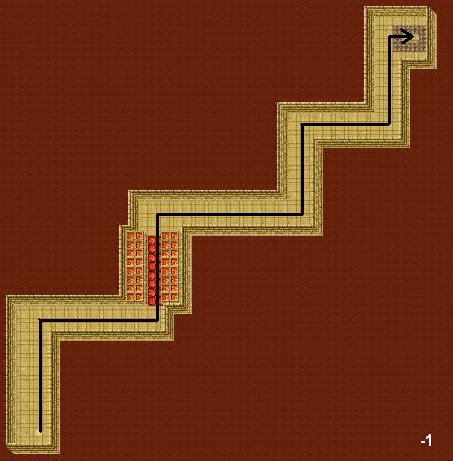
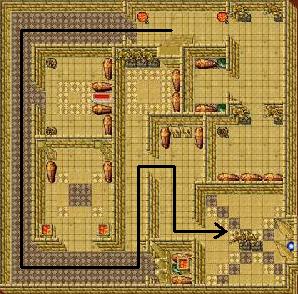
- Take the road as shown on the maps:
- Go all the way down until you reach the coal basin teleport (how to use it is written above).
- The path on the first level after the teleport looks like this:
- Here we will meet Stalkers, 2-3 Ghosts and a Bonebeast
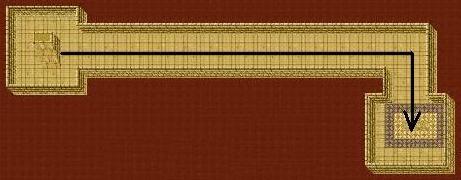
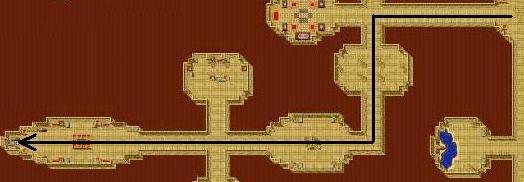
- Go down a floor below and head west, as in the map:
- Along the way Vampire, Demon Skeletons and Mummy. On the "last straight" there will already be a slight foretaste of the Pharaoh. We will meet 2-3 Banshee with a Lich and Ghosts encampment.
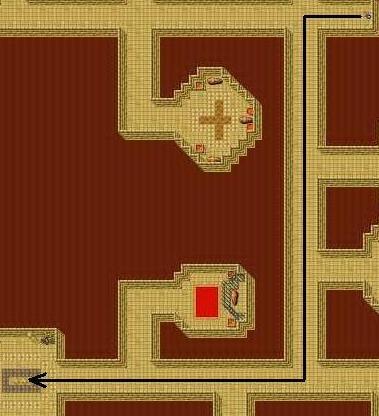
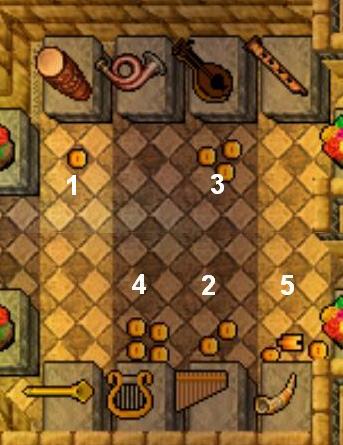
- At the end of the corridor we enter the teleport, and solve the musical puzzle. In a nutshell, it consists in the fact that we are to play 5 instruments in the correct order. The difficulty is that there are more instruments. It should be done in the following order:
- Enter the next teleport and meet Vashresamun, 2-4 Banshee, 4 Magicthrower and 2 Shredderthrower. To kill it, it is best to ask high-level mates, the Blocker should be at least level 100. The tactics are simple: the Knight enters first and stands with the Pharaoh in the middle of the room. Then a Druid should enter, who uses the heal friend spell to heal the blocker, and a Sorcerer equipped with the energy wave spell.
- When you kill a boss you will loot a special item: Blue Note, the person who has it will be able to jump into a teleport that will teleport him to the room with Part of the helmet: Left Horn.
Mission 2 - Rahemos - Oasis Tomb:
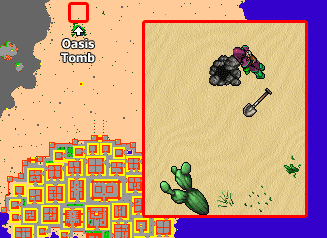
- The entrance to Oasis Tomb is located in the west of the desert:
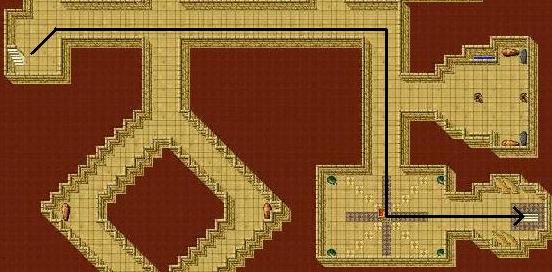
- After entering, we go exactly as the map below leads us:
- At the last chamber we will be attacked by Beholders, Necromancers and 5 Green Djinn. There is no getting around the use of the Dwarven Ring. Continuing to the right, towards the tp, we meet a Warlock, who is best pushed between the coffin and the teleport, which will prevent him from escaping. Kill him, and move on.
- We are taken to a room with a task that we perform only once (it stays forever). To go behind the door with the red flashing handle, click on the levers on the left until a carrot appears to us instead of a hat.
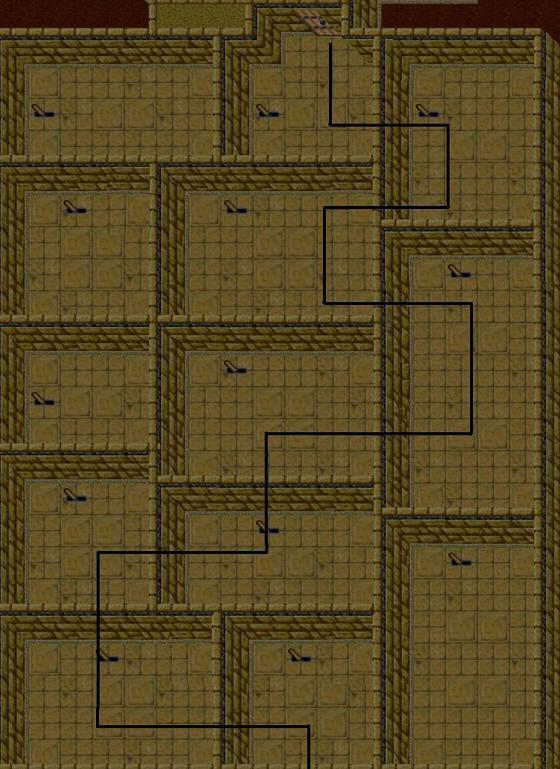
- Go through the door, where the second part of the task awaits us. Note!!! You can not move the levers that are located in each room. The fun is to go to the second part of the chamber. Each wall, as soon as you enter it - disappears. *Below is shown how this should be done:
- Once we have made it through the second part of the puzzle, we are shown a wide ramp that leads to the room with 9 Demon (Goblin).
- We enter the teleport to confront: Warlock and Rahemos, who summons Demons. In the middle of the room stands the Magicthrower. The fastest way to kill Rahemos is to have a high-level Knight (+150 lvl), a Druid who uses the heal friend spell and a Paladin. Since this monster has almost no defense against physical attacks, the Knight uses the fFierce berserk spell and the Paladin fires Assassin Stars.
- When you kill a boss you will loot a special item: Ancient Rune, the person who has it will be able to jump into a teleport that will teleport him to the room with Part of the helmet: Helmet Piece.
Mission 3 - Omruc - Penisula Tomb:
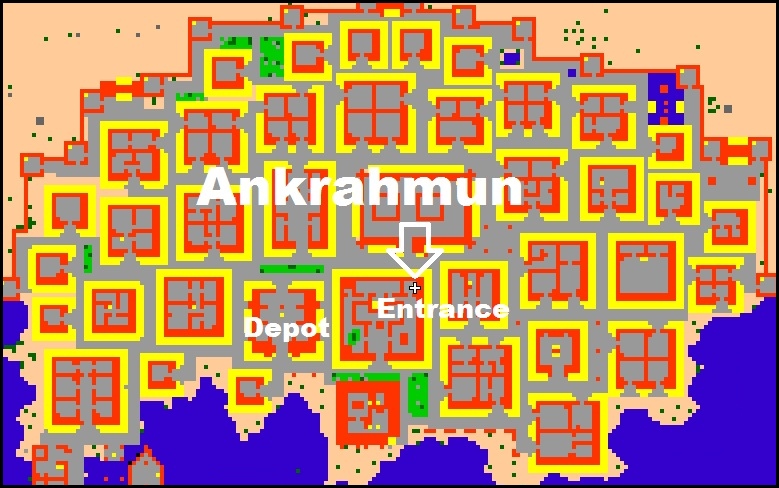
- To enter Penisula Tomb we need to go to the southwest of Ankrahmun town:
- We move according to the map:
- Throughout this route we will come face to face with large numbers of Vampire, Mummy, Ghosts and Demon Skeletons. Towards the end of the route we will additionally encounter Ancient Scaraba and Necromancers.
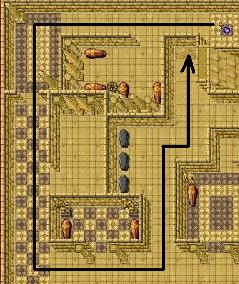
- After entering the tp, we encounter another obstacle. Invisible walls stand in our way, the route shown below:
- We enter the tp to face: 6 Magicthrowers and 6 Shredderthrowers, as well as Omruc, who often becomes invisible. To defeat the Pharaoh we will need Avalanche Runes. The help of a Druid with the spell Heal Friend will be very useful.
- When you kill a boss you will loot a special item: Crystal Arrow, the person who has it will be able to jump into a teleport that will teleport him to the room with Part of the helmet: Helmet Adornment.
Mission 4 - Dipthrah - Mountain Tomb:
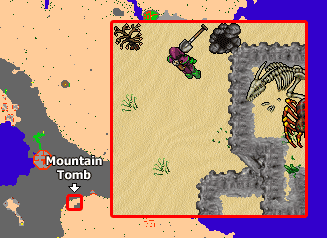
- Entrance to the tomb:
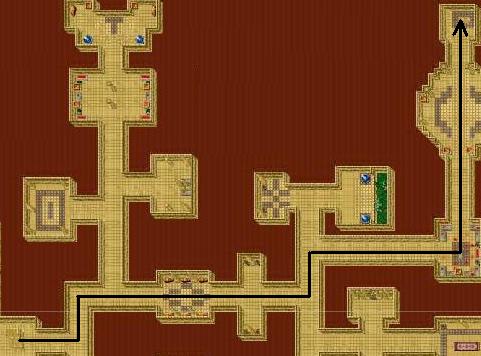
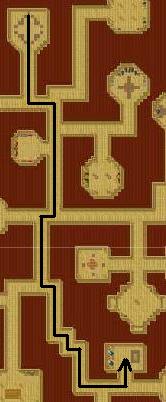
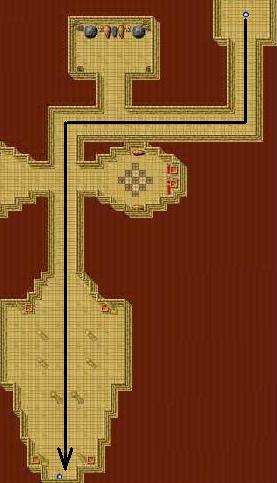
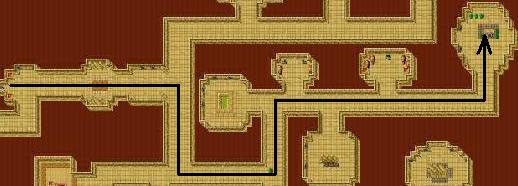
- We go as the map indicates:
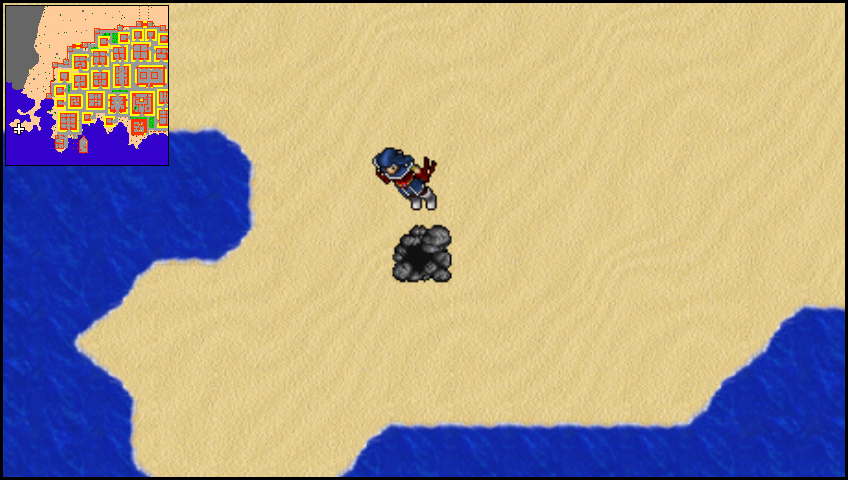
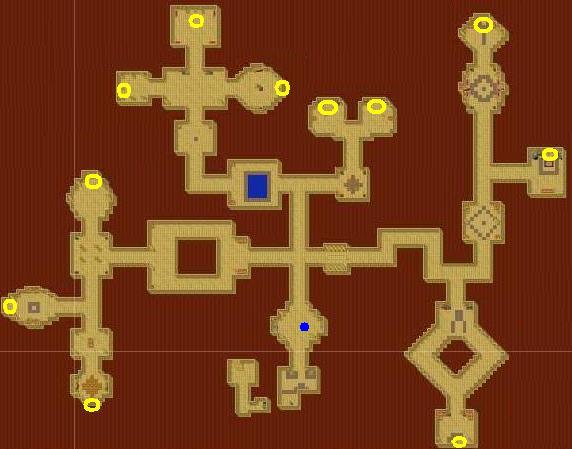
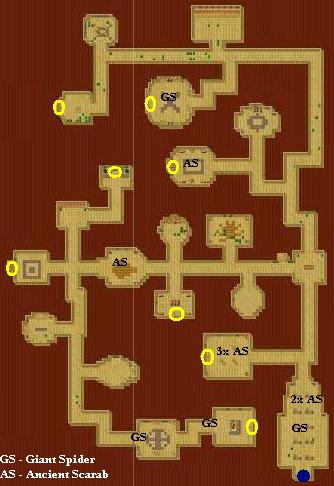
- Descend all the way down until you reach the teleport, at which you place Scarab Coin on the altar - proceed further. After passing through the barrier, pull 11 levers. The order is arbitrary. The levers are marked with yellow circles:
- After dragging all of them to the right side, the teleport (blue circle) will unlock, and allow you to move on:
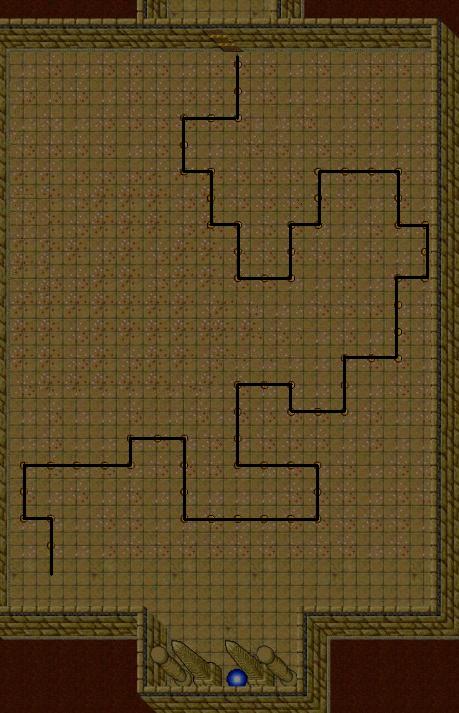
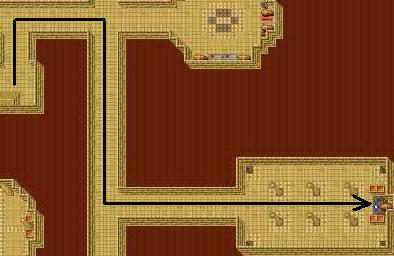
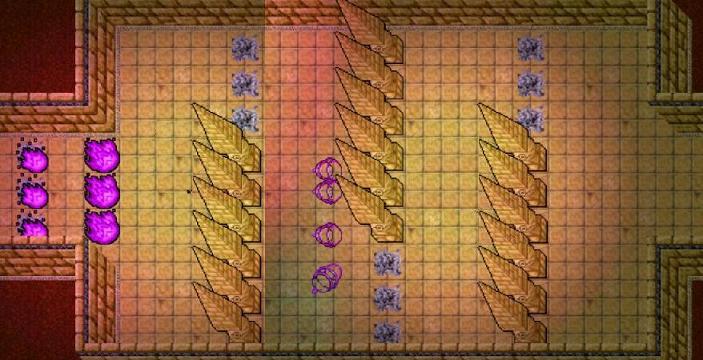
- Enter the teleport, go south and then east. There we encounter walls with 3 pairs of doors. It is important to go through them in the right way:
- We enter the teleport, to meet Dipthrah. There are 9 magicthrowers spread around the room. The blocker escapes with the Pharaoh to the south of the room, and the Sorcerers using the energy wave spell killing him.
- When you kill a boss you will loot a special item: Ornamented Ankh, the person who has it will be able to jump into a teleport that will teleport him to the room with Part of the helmet: Damaged Helmet.
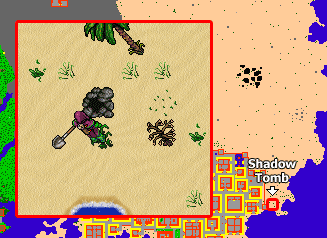
Mission 5 - Mahrdis - Shadow Tomb:
- Mahrdis is located in Shadow Tomb, east of Ankrahmun:
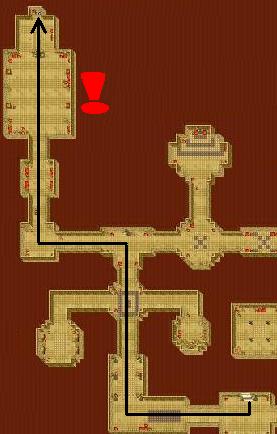
- Once we entered the tomb, we go all the way down to level 6, where we go behind the teleport. Behind the tp we go down to level 7 and go a piece to the east, where we go lower. Here we follow the map:
- In the room marked with a red exclamation mark we will be attacked by 3 Dragons, 5 Necromancers, a Fire Elemental and a Green Djinn. Kill everything, or run past and enter the teleport.
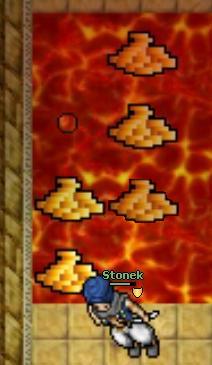
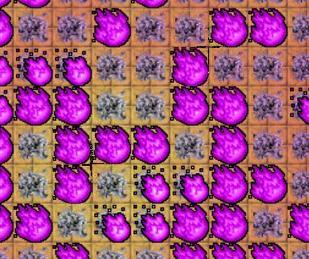
- Behind the tp we follow the only possible path until we reach strange pink flames. Each of these flames deprives us of 300 HP, so it's best to wait until they disappear and only then start the passage, there is no need to rush, because when we stand in place without fire, the appearance of it does not take away our hp.
- After the fires there is another teleport, leading to a room with Mahrdis, Dragon Lord, 2 Dragons and 4 Flamethrowers.
- To deal with this part of the quest you need to ask a really good Knight for help. Ideally, he should have at least 150 experience level. Once you enter the room the blocker should block Mahrdis in such a way as to stand between him and the rest of the players. The best and fastest way to kill him is to use the energy wave spell. And when there is no Sorcerer on the team, it is best to use Avalanche Rune.
- When you kill a boss you will loot a special item: Burning Heart, the person who has it will be able to jump into a teleport that will teleport him to the room with Part of the helmet: Helmet Ornament.
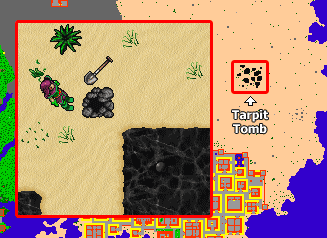
Mission 6 - Morguthis - Tarpit Tomb:
- The sixth part is performed in the Tarpit Tomb:
- We go down to level -6 where we go after tp
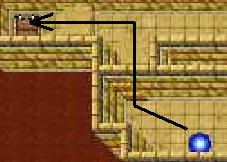
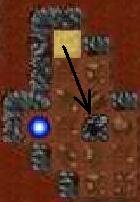
- Now we face a 'maze' style puzzle. Below is the way to beat it.
1). 
2). 
3). Go on the flame and enter the level above.
4). Go up a level higher.
5). We go north and go down a level lower.
6). We go east and enter the teleport.
7). 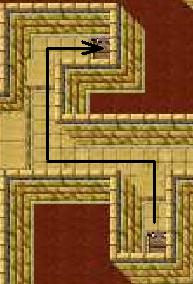
- The blocker blocks Deathslicer while the rest of the team runs to the sinkhole.
8). We go west and rope yourself.
9). Go south and go down a level lower.
10). We go down a level lower.
11). We go east and rope ourselves.
12). We go up to the flame and go down a level lower.
13). We go north and rope.
14). We enter the teleport.
15). 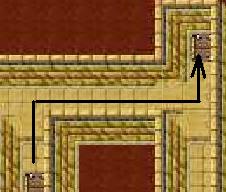
- The thing is the same as in point 7.
16). We go south on the way entering the flame, enter the teleport.
17). 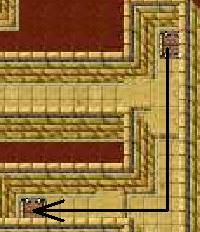
- The blocker paves the way by moving the Deathslicer south.
18). We go down a level below, NOT IN THE TELEPORT!
19). We go east and rope ourselves.
20). Go north by passing through the flame and enter the teleport.
21). 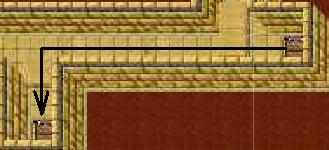
- The blocker runs to the left blocking Deathslicer while the rest of the team enters the sinkhole.
22). We go down a level below, NOT IN THE TELEPORT!
23). Go south and rope yourself.
24). We go west, enter the blaze and go north, descend a level lower.
25). We go southwest and rope.
26). We go west and rope ourselves.
27). We go south and go down a level lower.
28). Enter the teleport.
29). 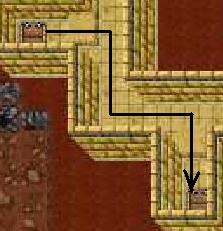
- The blocker runs to the right and blocks the Deathslicer. The rest of the team passes safely behind his back.
30). Go west NOT IN THE TELEPORT! and go down a floor below.
31). We go north passing in front of the flame and rope yourself.
32). We go north and enter the teleport.
33). 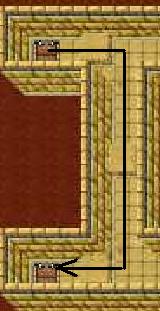
- We shoot the magic wall rune so as to cut off the Deathslicer's path and descend to the south, where we also encounter a Deathslicer, whom we push into the right alley. The team passes through and descends into the sinkhole on the left.
34). We go down, NOT IN THE TELEPORT!
35). we go down the alley to the northeast, cross the flame and go south. We rope ourselves.
36). We enter the teleport.
37). 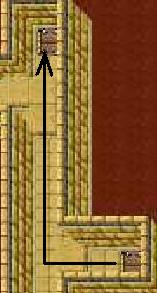
- Knight blocks Deathslicer while the rest of the team runs north and enters the sinkhole.
38). We go southeast, go through the flame, at the end of the corridor we enter the teleport.
39). 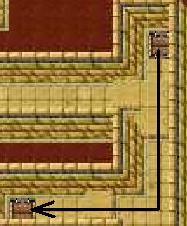
- Knight goes down south pushing Deathslicer. The rest of the team descends into the sinkhole.
40). We go down, NOT IN THE TELEPORT!
41). We go as in point #19.
42). We go as in point no. 20
43). After entering the teleport visible above us, we are transferred directly to Pharaoh.
- Knight, who is the main blocker should trap the pharaoh between the turrets, which will prevent the flip to the rest of the team. Mages using the energy wave spell kill Morguthis.
- When you kill a boss you will loot a special item: Sword Hilt, the person who has it will be able to jump into a teleport that will teleport him to the room with Part of the helmet: Right Horn.
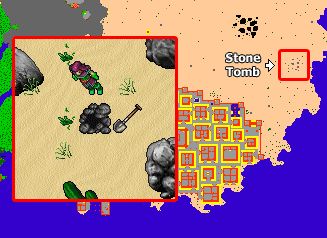
Mission 7 - Thalas - Stone Tomb:
- In the penultimate mission we will meet Thalas. In order to proceed with the seventh mission you need to find the Stone Tomb:
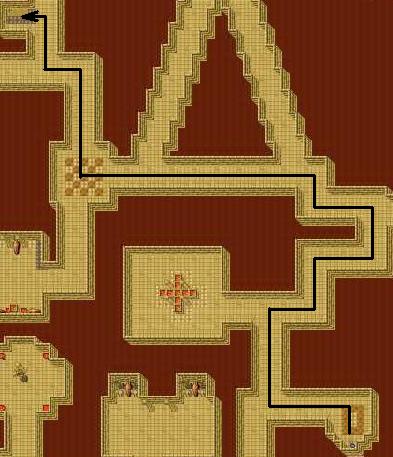
- Go all the way down to level -6, which is where you go behind the teleport. This is not difficult, as the descents are located right next to each other. We follow the path according to the map:
- On the next level we will face large numbers of undead monsters. Only in the places marked on the map with AS and GS symbols will we meet more resistance.
- There are levers located in places with yellow circles. It is necessary to move them at fairly the same time. Therefore, several are needed for this. If we managed to pull them properly as soon as possible we run to the place marked on the map with a blue circle. Time to enter the teleport is also limited, so all expedition participants should use the haste or strong haste spell. Once we have passed behind the tp, a Cobra surrounded by poison altars and a trellis to stand on appears to our eyes.
- Once we step on it, we are quite heavily poisoned, and our life level gradually decreases, starting from 50. However, it is necessary to enter the room with the Pharaoh, so DO NOT USE the antidote spell! Once everyone is infected, go down the corridor. There is a second Cobra there, to which we write "Hi", and it takes us to Thalas. Along with him are 4 Necromancers , and a Slime, which he summons himself. It will be best if the Sorcerer uses the energy wave spell to kill him. In addition to the help of undead, Thalas is supported by 12 plaguethrowers.
- When you kill a boss you will loot a special item: Cobrafang Dagger, the person who has it will be able to jump into a teleport that will teleport him to the room with Part of the helmet: Gem Holder.
Mission 8 - Ashmunrah - Library Tomb:
- If you have already collected 7 parts of the Helmet, go to Library Tomb to assemble it . Don't forget to bring with you all the parts you have collected so far!
- Follow the path:
- At level -3 go behind tp:
- After entering the teleport, we are transferred to the last corridor. Along the way we will meet only a dozen more turrets, which cannot be killed or weakened in strength. The first to go is the blocker, who takes the blows from all of them, followed safely by the rest of the team. At the end of the room is a tp, which eventually moves to the pharaoh.
- In the room with Ashmunrah (summoning Ancient Scarabs and Green Djinns) there are 4 Ghosts and Behemoth. They will need the help of a Druid with the spell heal friend. The rest of the team focuses on killing the Pharaoh himself and Behemoth. For this, it is best to use the energy wave spell.
- None of the parts needed to assemble the Helmet fall out of this Pharaoh. Therefore, as soon as we have dealt with the fight we leave the room. To do this, you need to drag 5 levers to the right side (they are arranged inside the room).
- Each one individually lays all the parts on the altar, and they automatically turn into Helmet of the Ancients (incomplete).
- Exit through the teleport.
NOTE!!! To get the full Helmet of the Ancients you need to put Small Ruby in Helmet of the Ancients (incomplete). However, it will return to its original incomplete form after 30 minutes.
